Good Evening, I hope you have all had a great 4th of July weekend with your family and friends!! Last weekend, we went to a family gathering we always do in the Summer. We eat and then the guys always shoot clay pigeons. Then, I got to see Fireworks on Monday and Tuesday night.
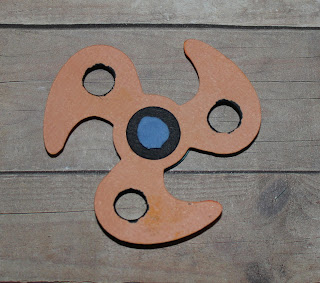
Last week, I created a fidget spinner card from the new Just Keep Spinning File from Kadoodle Bug Designs. I had a few requests for a tutorial on how to make the fidget actually spin, so I made another card with a picture tutorial. If I still didn't explain it well feel free to message me and I'll see if I can walk thru an explanation with you. : ) For this card, I used the new file
Just Keep Spinning from Kadoodle Bug Designs.
I just loved how Melissa made the title to me it looked kind of like graffiti, so I wanted the background to look kind of like spray paint. So to create the background I embossed it first with a light color powder. And then I colored over the top of all the embossing parts with the Green Spectrum Noir Marker.
 I put together the card base, title, the bear, and parts of the fidget spinner. In this picture to the right you will see the supplies I used to create the spinner part. I used thin glue dots, zig 2 way glue pen, red sticky tape, 2 pennies, 2 washers cut from paper and then a blue foam adhesive circle cut to a tiny size.
In the pic above I used the glue dots. I put a glue dot on the back of a penny and then I stuck that penny on the card base where I wanted the center of the spinner. And then I put a glue dot on the back of the blue round part and then you will stick the penny to the back of that.
Now, the front of this spinner has the blue part and the penny is attached to just the blue circle part with the star. The penny is not glued down to the spinner it's just sitting in front of the spinner where its suppose to go. This picture you will see the foam adhesive is in the hole part. The adhesive part will stick to the penny that is just laying in the front. And that will attach the two pieces together by just that foam adhesive circle or a dimensional if you have it.
In this picture, I added some red sticky tape to the blue nonsticky side of my foam adhesive circle. Now, if you have a some Dimensionals that would probably be best because both sides are sticky. But if you don't have any like me, then you will want the red sticky tape to match the foam as closely as you can get it. After that you just place that sticky part of the fidget spinner to the penny that is already attached to the card. Then press Down. You might have to spin it a few times so that it gets used to spinning.
Below is a complete list of supplies and materials used to complete this project:
Paper Piecing.
KaDoodle Bug Files: Just Keep Spinning
Colorbox Chalk Cat's Eyes Ink: Brown, Cocoa, black, lime, canary, marigold & Orange.
Studio G Ink: Blue
Studio G Ink: Blue
Adhesive: Atg Gun, Zig 2 way glue, Foam adhesive, glue Dots thin and red sticky tape.
2 pennies
2 pennies
White Gel Pen: Signo Uniball White pen
Black Micron Ink: 01
All Night Media: Splatter Pattern
Spectrum Noir Markers: Green CG1
Black Micron Ink: 01
All Night Media: Splatter Pattern
Spectrum Noir Markers: Green CG1
Stampin Up: Seafoam embossing powder
I hope you are enjoyed the Spinner Card!! Look forward to hearing from you!! : )
Have a blessed weekend !!! : )


This is cute!!! You did an amazing job!!
ReplyDeleteThank you so much Beckie!! I truly appreciate it!! : )
Delete